A mini smart scope for professional astrophotography and prints? Yes, you can.
Some time ago I found myself under one of the darkest skies I’d ever seen, with nothing to photograph it with.
Would you judge your favourite telescope by an hour of data and whatever a “wizard” app did with it? Probably not. I wouldn’t judge my Esprit that way either. Yet that was pretty much all I’d seen of smart scopes, and it’s why I didn’t get one for a long time. I already had two serious setups.
That night changed my mind. I decided to give the smallest one a go. The only one that made sense to me was something I could put in my pocket, or any small bag or backpack, and have with me wherever I went. The DWARFLAB Mini.
I wasn’t looking for an outreach telescope. I wanted to use it for serious astrophotography and make more prints.
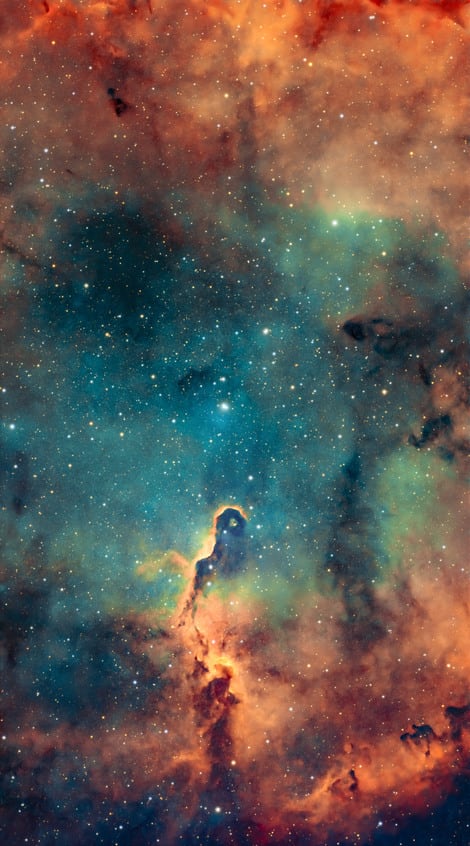
After quickly checking how to use it in Equatorial mode, how to get its RAW darks and lights, how to schedule objects from my own planner (where I do framing etc.), I waited for clear skies, and I pointed it at an old favourite, the Elephant’s Trunk Nebula. Could I get a photograph out of this little thing that I’d be happy to put on somebody’s wall?
Who is a smart scope actually for?
I’ve never had a problem with smart scopes. What bothers me is how they’re sold. Seeing a nebula appear on your phone on the very first evening is a lovely introduction to astrophotography. If you’ve ever tried to explain to someone why you’re standing outside in the cold photographing something neither of you can see, you’ll know the appeal of that screen!
But for this experiment (and print!) I used the Mini the same way I use my Esprit, a much bigger and more expensive telescope. I photographed the Trunk over several nights, picked the best RAW exposures and did the stacking and processing myself.
And after seeing the results, I think the smart scopes marketing misses the experienced astrophotographer. If you already know how to get the best out of a RAW file, something like the DwarfLab Mini gives you a capable telescope for trips where you’d usually leave yours at home.
Data quantity -and sky quality- are even more important with a smart scope
The camera collects the light during each exposure. You stack the exposures afterwards to separate the signal from the noise. Once you’ve lined up the stars, the faint object's light stays in the same place, while the random grain changes from shot to shot. Averaging the frames lets the stable light show through the random noise.
The Mini’s small lens collects (much) less light than my larger telescopes. So dark, clear skies and several hours or more are paramount to recover details and data.
That sounds backwards for a telescope sold (wrongly!) on quick pictures. For a good print you want more exposures. The Mini is so light and quick to set up that even one clear hour is worth taking it outside again. I found myself in the situation several times: it's ready in seconds, it aligns in a couple of minutes and it just goes.
More data makes the whole difference to allow a small scope to punch well above its weight (which in this case is incredibly low!).
Look at the bright lip around the dark tip of the Trunk. You can find it immediately in all three images. At 2½ hours I could already recognise the shape. If all I’d wanted was to show someone the Elephant’s Trunk, I’d have had a picture to send.
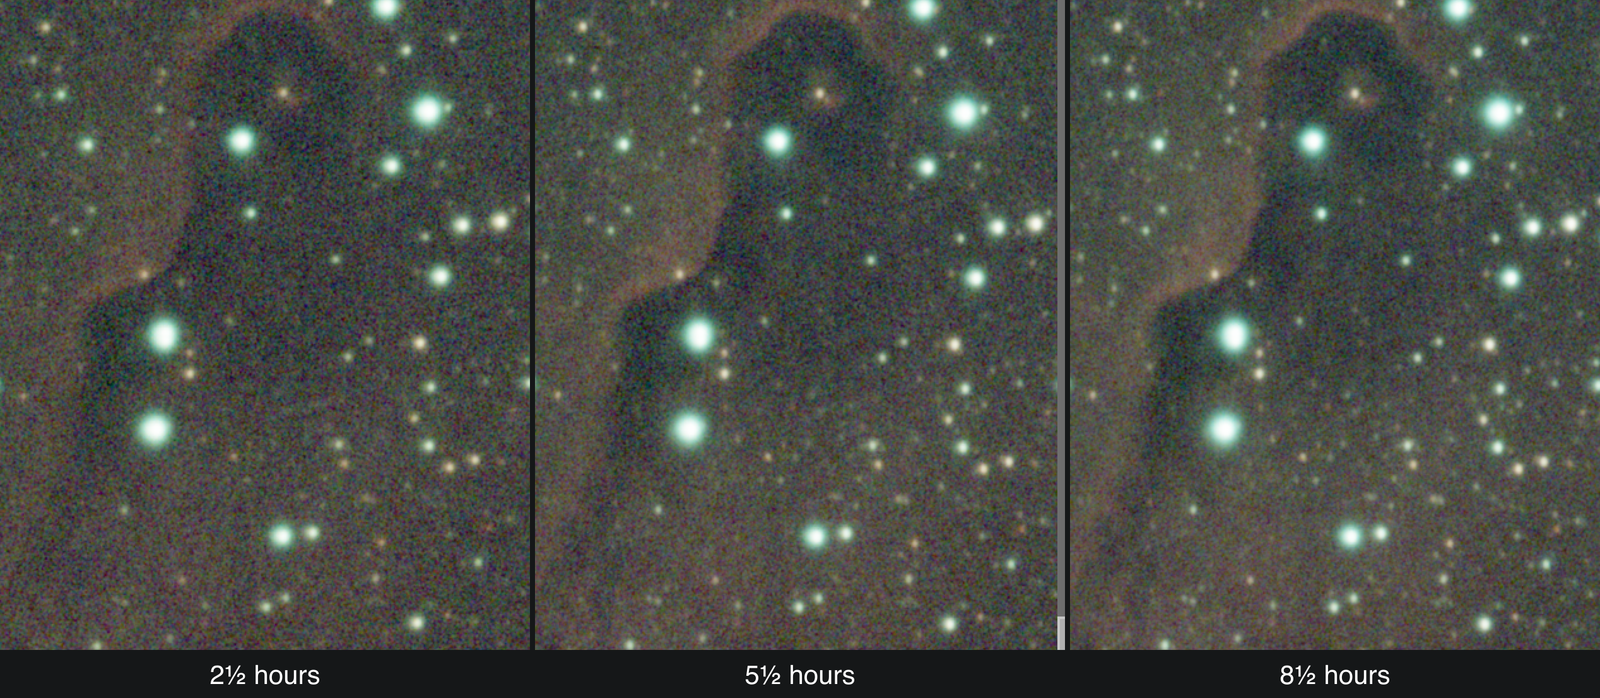
At 5½ hours the edge is easier to follow. By 8½ hours I can also see changes in the brightness of the cloud beside it. The more hours I added, the clearer the nebula looked, and the signal-to-noise measurements went up too. I could still see the difference between 5½ and 8½ hours. I’d like to find out how far I can take it before another night makes little difference to the finished print.
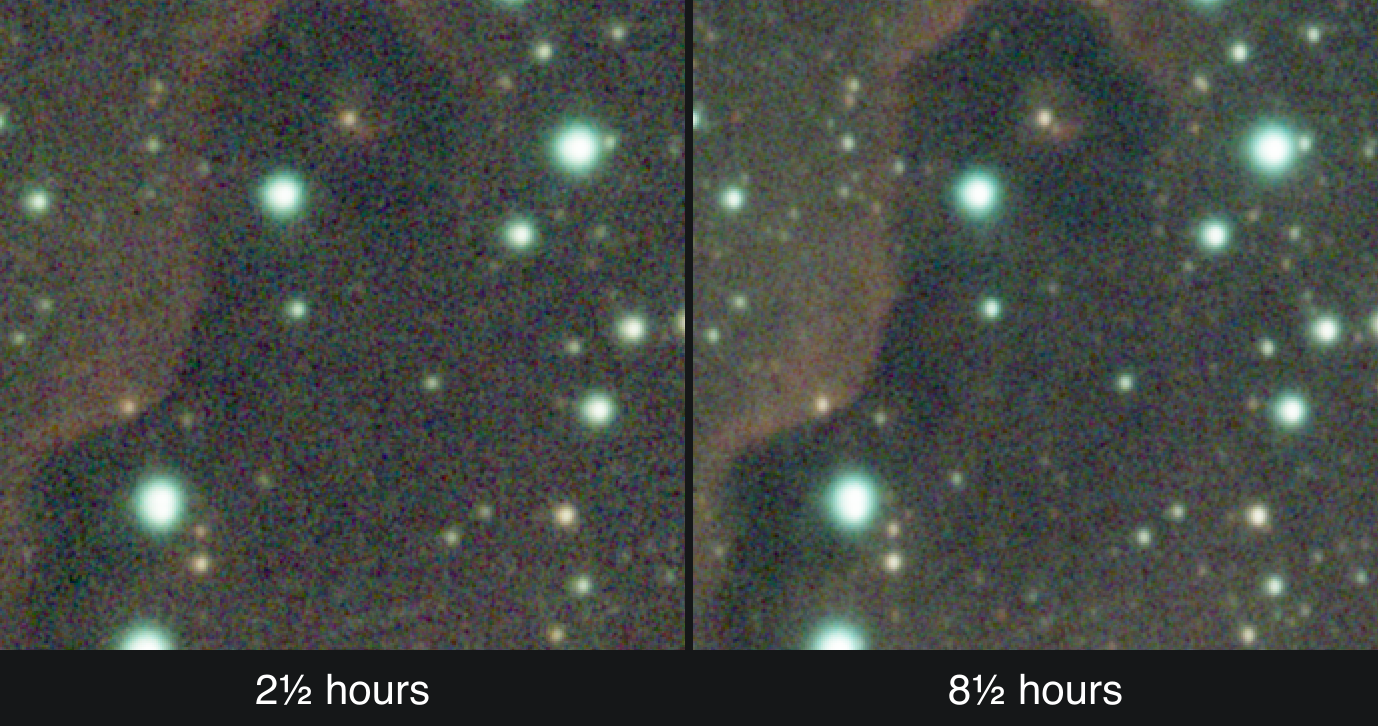
You could denoise the 2½-hour image and get a smoother background. But where faint dust looks like grain, a denoiser can smooth away both. Smoothing can’t supply that missing detail, but more data can.
How I used the Mini
Here’s what I’d do if I were setting up to photograph the Trunk again tonight.
| Step | What I did and why |
|---|---|
| Choose the sky | I look for the darkest, clearest sky I can get. Later I go through the individual exposures by hand. If cloud has washed out the background or the stars have trailed, I leave that frame out of the stack. The internal software is not selective enough. |
| Set up the tripod in EQ mode | I used the original DWARFLAB hydraulic tripod in equatorial mode. I checked the alignment on a patch of sky near the celestial equator and adjusted the tripod until the reported error was 0° (or 1°). This allows my Mini to track up to 90s or 120s (accepting a higher percentage of frames thrown away). |
| Set the exposure | I used 90-second exposures at gain 60. Turning up the gain amplifies the noise in this not-cooled camera, so I keep it at 60 or below and make up for it with more time on the target. |
| Use the RAW files | I use only the individual RAW exposures and individual RAW dark frames, ignoring any stacked file made by the internal software. Exactly like on all my other setups. |
| Classic post processing | I calibrated, stacked and prepared the selected files in PixInsight as my usual, and finished it in Photoshop. The Elephant Trunk is an extensive object with a lot of different colours and faint details, beautiful but also challenging to get right. |
From a pocket-sized scope to a print
There’s another reason I keep the separate files. With hundreds of good frames, I was able to use drizzling in PixInsight with surprisingly good results, making up for the native low resolution (2MP) of the camera. That gave me more to work with when I prepare the print.
The finished photograph is 3,095 × 5,572 pixels. I chose a narrow, upright print for it because I like the long stretch of coloured gas above the Trunk. A 9 × 16 inch print keeps almost all that composition. The extra hours show their worth in particular in the fainter parts of the image.
Where does the Mini fit alongside my other telescopes?
My Skywatcher Esprit 120 is my fixed setup at home, on an iOptron CEM70 mount. It’s the telescope I’d reach for to pick out fine structure in a small galaxy. And it's incredibly heavy and complex setup, that's why it's fixed.
I already have a portable rig, too. My Altair 60 EDQ Quadruplet gives me a wider field of view at 300 mm. It doubles as my second setup at home and comes with me on dedicated astrophotography trips. The whole rig, including the Altair 585C camera and Juwei 14 mount, fits in one 10 kg cabin trolley.
The Mini is the one I keep in my backpack wherever I go. Even on a trip that has nothing to do with astrophotography, I’m ready if the sky clears or I find myself under a particularly good sky. I look for a subject that suits its field of view, maybe a mosaic if I'm away somewhere and I have several nights.
My bigger setups can resolve finer detail of course, but I take the work I do with the Mini just as seriously. Give it the right subject, enough clear nights and the same care in processing, and a print from the little scope can be every bit as striking on the wall.
DwarfLab did not send me any scope and probably don't even know this article exists! ;-)